Introduction:
A glass failure expert witness performs a root cause failure analysis on an exploding beer bottle. . The object of this root cause failure analysis is to determine the cause of the bottle failure.. More to the point, the objective was to determine if this bottle failed as a result of a manufacturing defect (i.e. was there a product defect) , or was the failure a result of user error.
Summary:
Root cause failure analysis indicates that beer bottle failed as a result of handling damage. When the bottle was being put down between the front seats in a van, it was damaged on the bottom near the edge when it hit a hard object. The result were a small chip and bruise created on the bottom of the bottle near the edge. Because the beer was under pressure, the forces involved caused the bottle to break and cause pieces of glass to become dangerous projectiles. In this case there is no product defect (i.e. manufacturing defect); therefore, there is no product liability case to pursue.
Background:
At the time of the failure (explosion) the bottle was being placed on the floor of a van between the two front seats. The beer had just been purchased at a convenience store and it was not in a bag. As a result of the explosion, a person received cuts from the flying glass.
Procedure:
The bottle was assembled to visually observe the crack pattern. Later the crack origin was viewed and documented with a low power microscope.
Results:
Finding the Origin
The overall condition of the bottle pieces was observed (Figure #1). Next, the entire bottle was reconstructed to observe the overall crack pattern. This allows one to determine the general location of the origin. In this case there was no indication of an origin on the side of the bottle. Therefore, the reassembled bottom (Figure #2) was examined carefully. As shown in Figure #2 at one site there was a crack exiting the bottom and spreading out. Figure #3 is a photomicrograph of the region of the spreading crack. This indicates that this portion of the bottom contains the failure origin.
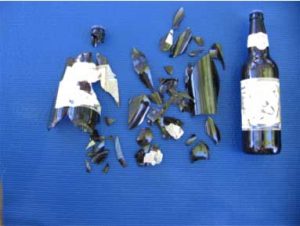
Figure #1: Photograph the as received pieces of the broken bottle. These are laid out alongside an exemplar bottle.
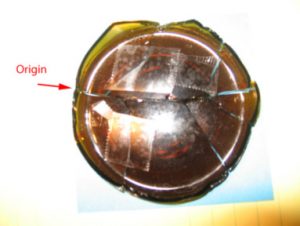
Figure #2: Photograph of the reassembled bottle bottom. The location of the exiting crack associated with the origin is indicated. The view shown is from the inside of the bottle.
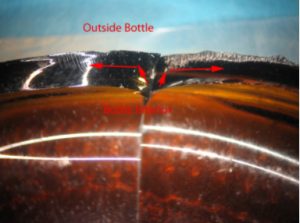
Figure #3: Photomicrograph of the crack exiting the bottle bottom. One can see that there is a crack spreading out (indicated by the arrows) at this point. Thus, this crack is associated with the origin (Mag. 8X).
Examination of the Origin
The crack originated at a chip on the bottom of the bottle. Figure #’s 4, 5 & 6 are photomicrographs of the origin on the fracture surface. Figure #7 shows that the fracture origin on the bottom edge of the bottle. This failure originated at a chip and bruise on the bottom of the bottle.
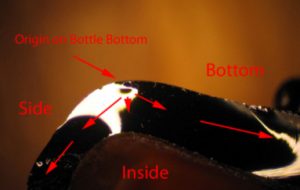
Figure #4: Photomicrograph of the fracture origin. The failure originates on the bottle bottom on the outside of the bottle. This micrograph is useful because one can see the shape of the bottom corner (Mag. 8X).
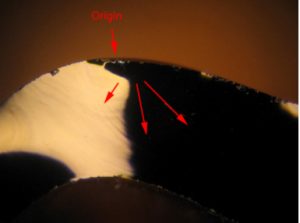
Figure #5: Higher power photomicrograph of the fracture origin. The failure originates on the bottle bottom on the outside of the bottle. This micrograph is useful because one can still see the shape of the bottom corner (Mag. 20X).
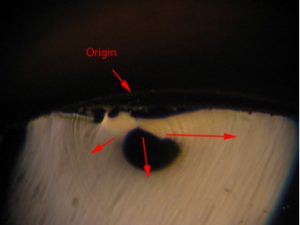
Figure #6: Even higher power photomicrograph of the fracture origin. This photomicrograph shows definitively that the crack is spreading from the origin (i.e. the Wallner lines are spreading from the proposed origin) identified in Figure #’s 4 & 5 (Mag. 40X).
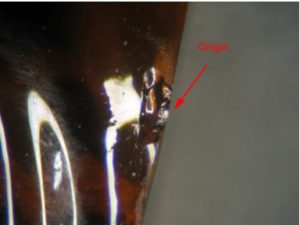
Figure #7: Photomicrograph of the fracture origin from the outside of the bottle. The failure initiated at a chipped location on the bottom of the bottle near the outer edge (Mag. 40X).


