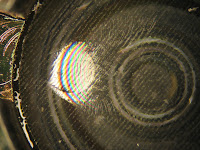
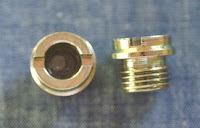
California failure analysis expert and manufacturing engineer was engaged to perform a root cause failure analysis of shallow cracking in the seal glass. These glass to metal seals were made by one manufacturer and then sent out to another processor to be plated. The photograph on the left shows two sight glasses. The body of the seal has male pipe thread and there is a screw driver slot on the top. The intent is for these seals to be screwed into a container wall. The glass window allows one to view the container interior (i.e. see the fluid level). The photomicrograph on the right shows a typical crack. These cracks occured during plating; they are always shallow and always associated with the one of the screw driver slots. The “rainbow” that is seen is due to the air wedge created by the shallow crack. The stress pattern of these seals is symetrical; therefore, sealing stresses are not implicated. Because glass only fails in tension and because these cracks are associated with a screw driver slot, the glass expert believes that they occur when the seals come out of the hot plating bath (195°F) and cool rapidly either in the air or when spray rinsed.
Materials Failure Analysis and Process Engineering


You are here: Home / Failure Analysis / Glass Expert Performs Failure Analysis of Glass to Metal Seals
Read Consulting Failure Analysis
Thomas L. Read, PhD,
1435 Fulton Road Santa Rosa, CA
Phone: 707-494-5089
email: info@readconsulting.com
Registered Professional Engineer
Thomas L. Read, PhD., CEO
Registered Professional Engineer
Certificate No. MF002174
State of California.

