Background:
Glass Expert examines a manufacturing defect found on tempered windows installed in a custom home. During installation, the windows were dirty and the defect was not detected. After installation, the windows were cleaned and the construction defect was discovered. A sample window was sent to the glass experts at Read Consulting; they were asked to perform a root cause failure analysis to determine the cause of the manufacturing defect.
Summary Conclusion:
The window defect is caused by an array of glass particles “stuck” to the glass surface. This is a manufacturing defect, and it cannot be corrected by the user.
Defect Overview:
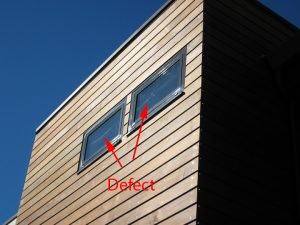
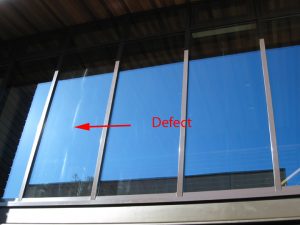
Figure #1 shows the defective windows as seen from the exterior of the building. The visibility of the defect depends on the cleanliness of the surface and the lighting angle. Note that it is approximately in the center of the pane and lies parallel to the long side of the window. The defect has the appearance of a “scuff” or a streak of dirt. In addition, the window surface in the affected area is “rough”.
 |
 |
| A | B |
Figure #1: Photograph of window defect as seen from the building exterior. When the window is dirty, the defect blends in with the dirt. Cleaning revealed the defect. The visibility of the defect depends on the cleanliness of the surface and the lighting angle. Note that it is approximately in the center of the pane and lies parallel to the long side of the window.
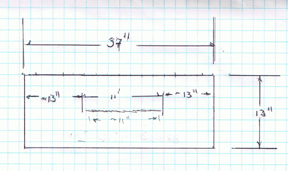
Figure #2: Sketch of the defective window submitted for failure analysis. The location of the window defect is indicated. The window is 37” X 12”. The defect is a 1/2” wide “scuff mark” that is approximately 11” long and it lies in the center of the representative window. It is also parallel to the long side of the window.
Methods of Examination:
The test window was examined visually and with optical microscopy. In addition a sharp probe was used to try to dislodge particles.
Results
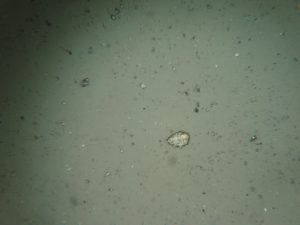
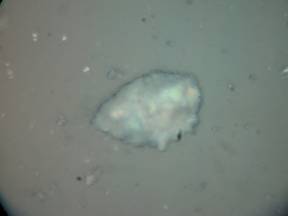
Figure #3: Photomicrograph of a portion of the scuff mark. It indicates that the defect is caused by an array of small particles strongly bonded to the glass surface. They could not be removed with a steel probe. It is believed that these are glass particles transferred to the surface during the glass temper process (Mag 200X).
Discussion:
A Strain Optics Grazing Angle Surface Polarimeter (GASP ) was used to determine the stress state of the test window. It is fully tempered (it has a surface compressive stress of14, 000 PSI). According to GANA and other flat glass organizations, Adhered glass particles is a known defect on tempered glass. It is created by is small particles of glass (i.e. glass dust), generated during the sizing operation, that have attached themselves to the hot glass surface during tempering. The temperature of the glass is high enough that these particles weld to the surface and cannot be removed. Often these particles is a contaminate on the rollers used during a horizontal tempering process.


This looks more like a defect called crush damage. This is caused by the edges of the glass curling up during time in the furnace. The glass will ride on the ceramic rolls like a boat causing the center of the lite only to contact the furnace roll. The optical haze cause by crush damage is referred as lensing. To get rid of lensing in glass, aspirators must be used in order to force heat on the top side of the glass and prevent the edges from curling up.
Interesting observations. However,there are particles of glass stuck to the glass surface. They will stick to a hot glass surface. I would assume that lensing would look different.