Note: Glass Fractography is the most effective method for determining why a glass object, such as a bottle, failed. This technique consists of examining the fracture surfaces of the failure for artifacts such as Wallner lines and using them to trace the crack back to its origin. Once the origin has been identified, it can be examined in detail with a microscope to determine the cause of the failure.
Overview: Figure #1 is a photograph of the failed bottle that was examined. It is apparent from the photographs that the bottle separated at the neck. Only two pieces of the bottle remained. There are pieces around the origin that are missing; however, one complete half of the origin is present. This is sufficient to make a determination as to the cause of failure.
Neck and Cork: Figure # 2 is a close-up of the cork and neck. Visible in the region of missing glass is a slit in the side of the cork. The slit is where the corkscrew exited the cork and damaged the interior wall of the bottle.
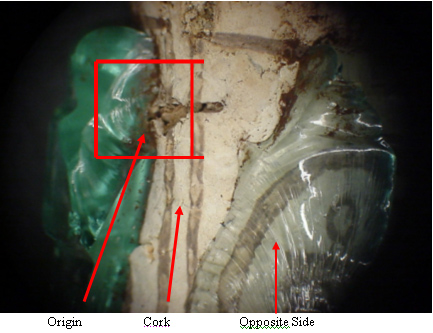
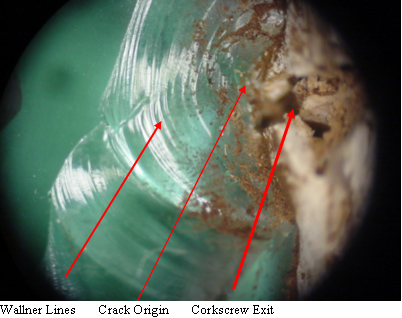
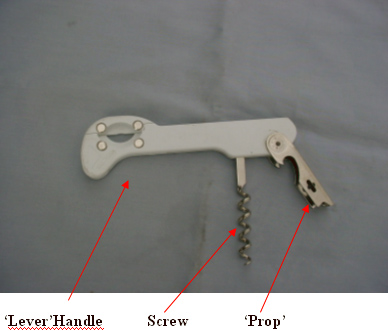
Crack Origin: The crack originated at the exit of the corkscrew (Figure #’s 3 & 4). This is indicated by the concentric Wallner lines that locate the initiation site on the interior wall of the bottle in the neck.Corkscrew: The type of corkscrew that was used is shown in Figure # 5.
Conclusion:
The bottle failed as a result of corkscrew damage to the interior surface of the bottle. This damage occurred because the corkscrew was driven into the cork at a severe angle. This allowed the corkscrew to exit the cork on the side and drive itself into the inside wall of the bottle at the neck. The corkscrew “scored” the inner wall of the bottle and initiated the crack. The crack propagated as the cork was being pulled out. This allowed the top to separate from the remainder of the bottle. This failure was a result of improper use of the corkscrew; it was not caused by a manufacturing defect nor a defect created by the bottling process. This is strictly operator error. It is suggested that a corkscrew that aligns the screw along the axis of the cork and doesn’t use leverage to remove the cork would eliminate this type of failure

Figure #1: Photograph of the failed wine bottle.

Figure #2: Macro- Photograph of the bottle neck in the region of the crack initiation site. There are several important aspects of the neck that are visible in this photograph. First, there is a “slit” in the side of the cork; this is in the region of the crack. In addition, it is associated with damage at the top of the cork. The damage in the cork indicates where the corkscrew entered the top of the cork and where it exited on the side.

Figure #3: Photomicrograph of the crack origin (on the left of the photograph), the cork and the side opposite the origin. This is indicated by the concentric Wallner lines emanating from the origin on the free surface. (Mag. 8X)

Figure #4: Higher magnification of the crack initiation. It is directly associated with the exit of the corkscrew from the cork. The concentric Wallner lines emanate from the initiation point (similar to waves from a rock thrown into water). Mag. 20X

Figure #5: Photograph of the type of corkscrew responsible for the damage to the interior of the bottle and the failure. The screw is driven into the cork, and then the ‘prop’ is located on the bottle top. Finally, the cork is lifted by leveraging it out with the prop. If the tip of the screw is against the bottle wall, the prying can cause the inside of the bottle neck to be scored, and this can initiate failure.


